Game audio
now browsing by category
Feature-Packed Audio Dialog Tool 25% Off
Until the end of April, Alto Studio 3.2 – which now includes VoiceFX - is at US$290 only (instead of US$390)! Here are some of the features you can get for less than the price of some metering plug-ins… Don’t miss this unique opportunity to get the ultimate game audio dialog tool!
- Import dialog files from a Wwise, FMOD, ADX2 or Fabric project.
- Import dialog files referenced by an Excel sheet or directly from a folder with a prefix / suffix / or sub-folder per language.
- Import scripts and character names from a Final Draft project or from Excel sheets.
- Check for missing or extra files.
- Analyze the audio characteristics of the files (format, sample rate, bit depth, number of channels, duration, loudness, leading and trailing silence, average pitch).
- Verify that the audio files match user-defined characteristics.
- Compare the audio characteristics of the reference files with localized files in one or several languages.
- Correct the errors (perfectly or within valid error range)
- Generate beeps or silent files for missing files.
- Generate full reports in Excel, PDF, HTML, or XML format for your clients or teammates.
- Export dialog audio files and automatically create events and containers in your Wwise / ADX2 / FMOD project.
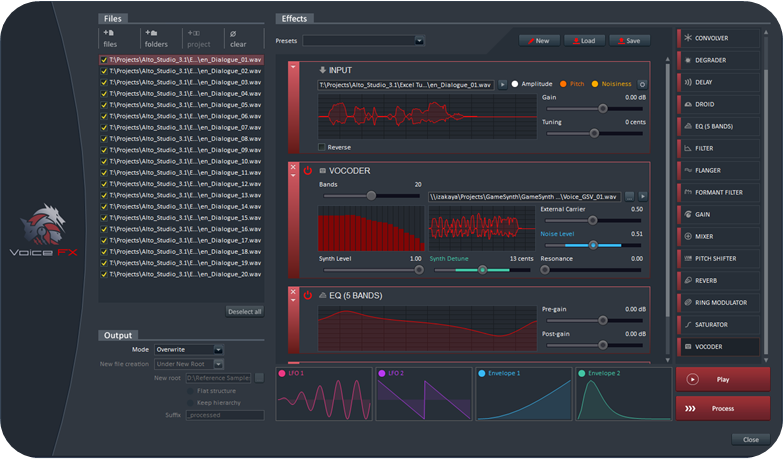
- Combine the 19 racks (vocoder, convolver, equalizer, ring modulator etc.) of the VoiceFX tool to create monster, robot, alien voices and more!
- Use the loudness equalizer tool to match the loudness (LUFS) of a reference file or a user-defined value.
- Use the placeholder speech synthesizer to automatically create temporary files in various languages with a different voice for each character.
- Use the best audio file renamer on the market (can even rename files based on their audio characteristics).
- Use the interactive dialogue tester to ensure that voice lines concatenate seamlessly.
- Generate lip-sync animation files in conjunction with FaceFX.
- Batch-process audio files by interfacing with Tsugi’s AudioBot.
- Generate run-time IDs for each dialog line.
- Use the plug-in system to extend functionality or interface with your proprietary technology.
- Call the command line version from your build pipeline to automate audio validation tasks.
Yes, that’s right, you can do all that – and a lot more – for only $290, so make sure you seize this opportunity today as this is a time limited offer!

An introduction to ADX2 from CRI Middleware
There is a new game audio middleware in town and it’s rocking hard! Except… it’s not really new, has already been used in more than 3000 games and offers all the features you would expect from such a tool, and some more: DAW-like interface with plenty of interactive functions, proprietary audio codecs for blazing-fast playback, an API which is super-easy to work with and to integrate into your game etc…
How is this possible I hear you ask? Discover ADX2 from CRI Middleware (@CRI_Middleware), one of the best kept secrets of the game audio industry and the de facto standard in Japan, now finally coming to the West.
A DAW for your game audio
ADX2 is composed of an authoring tool (AtomCraft) and a run-time API. AtomCraft looks and feels like a usual DAW, one which would have been built for game audio. That’s probably why the learning curve is so gentle, compared to say something like Wwise. At the same time, when you really need some hardcore interactive features, ADX2 does not stay stuck in the DAW paradigm and will offer you the full power of a game audio middleware, but in very natural way, with arguably one of the best user interface available today for this type of tool.
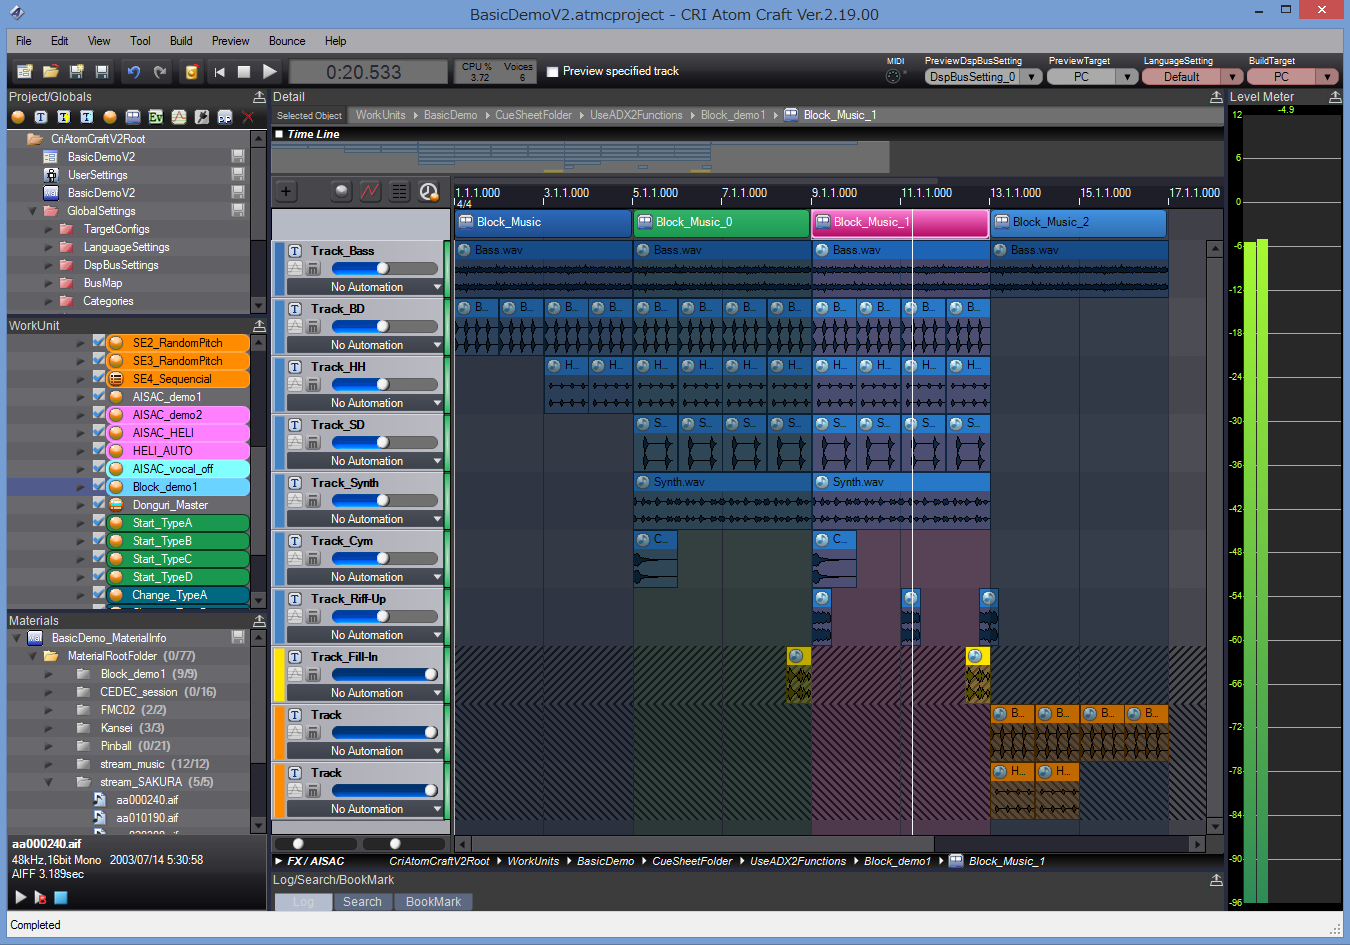
In AtomCraft, you design Cues that will be triggered from the game and are organized in CueSheets (i.e. sound banks). A Cue is composed of one or more Tracks. Each Track can in turn have one or more waveforms placed on a timeline (they can have different encoding, filters etc…). The way these Tracks are played when a Cue is triggered depends on the Cue type. You will find a Cue type for all the usual behaviors (polyphonic, sequential, shuffle, random, switch etc…) and even more, like the Combo Sequential type, for example. This type of Cue directly implements a combo-style sound effect: as long as you keep triggering the Cue within a given time interval, it will play the next Track. If you miss that time window, it will come back to the first Track. So drop your samples, select that type of Cue and start your fighting game in a couple of clicks! Of course, you can nest Cues, call a Cue from another Cue etc… Actions can also be added to a Track timeline to insert events such parameter changes, loop markers (at the level of the Track) etc…
If Tracks are useful to create sound layers, the Cue timeline can also be divided vertically in blocks, which is particularly useful to jump from section to section based on the game context (for example when composing interactive music).
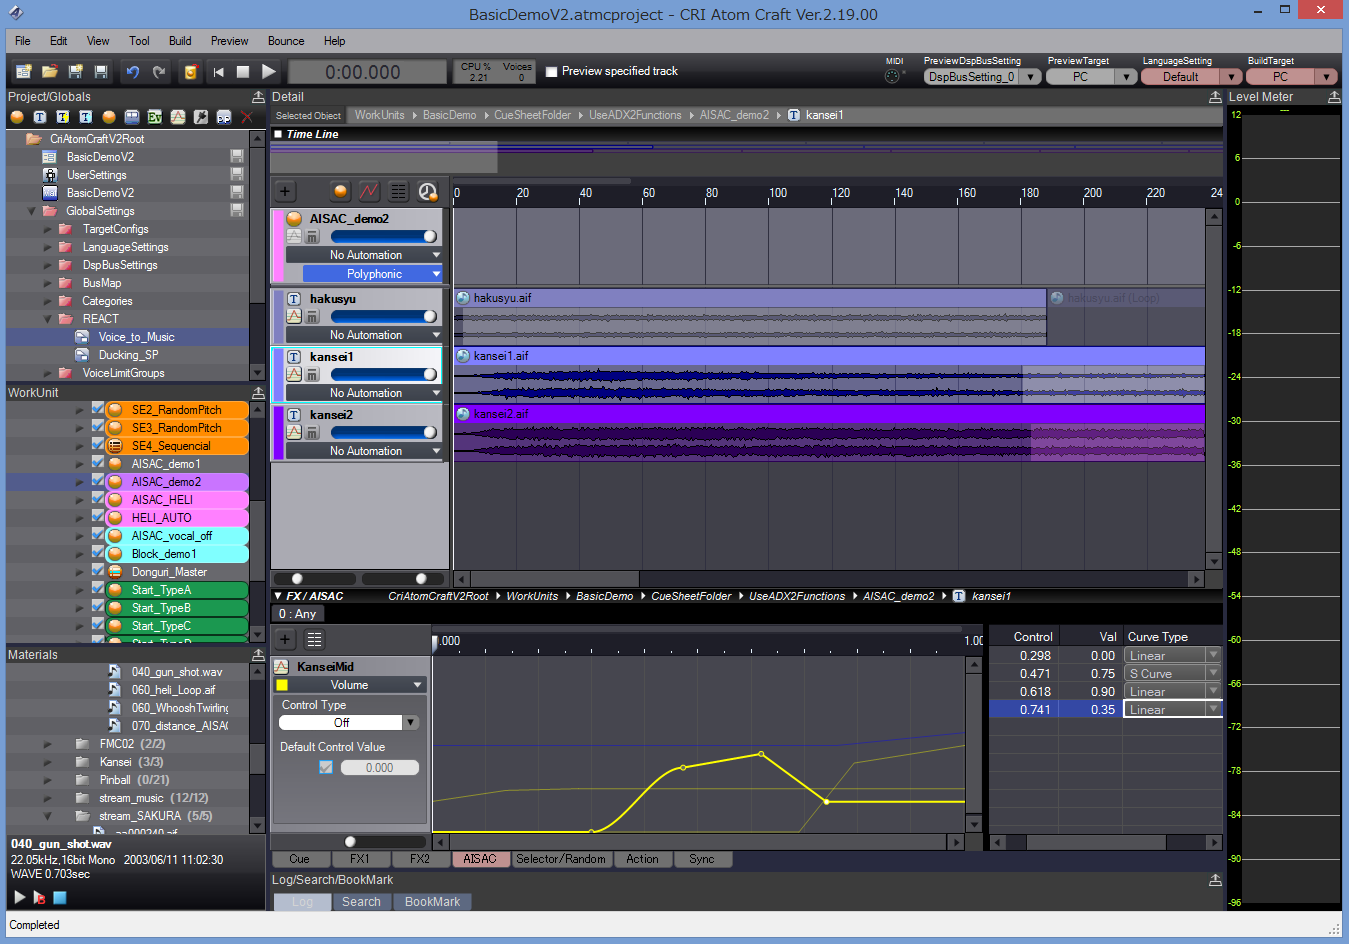
Speaking of the game context, to control the sound from the program RTPCs – both local and global – can be assigned to pretty much every parameter (including another RTPC) and they can have modulation and randomization features. RTPCs are called AISACs in the ADX2 vernacular.
To continue with the DAW analogy, automation curves, mixer and effects are of course also available.
Your idea into the game in no time
Everything in AtomCraft is always a click away. Basic tasks are ultra-fast, while complex interactive behaviors are a pleasure to design. Drop samples from the Windows Explorer onto a CueSheet and the samples will be added to the project as Materials, a Cue will be created with Tracks for the waveforms. You just have to press play! Need a random range on that parameter? Just click on the parameter slider and drag the mouse vertically instead of horizontally: here is your random range.
No need to open a randomizer window or to add a modulation parameter, no need to click many times, open or close windows, features are always there where you need them.
The API has been designed in the same way: uniform and coherent, very easy to learn and to use. Modules are configured, initialized and operated in the same way and API functions follow a clear naming scheme. ADX2 truly empowers both the audio designer and the audio programmer. Depending on the wishes or skillset of your audio team, you can decide to have the sound designers control the whole audio experience, to put the audio programmers fully in charge or a mix of both.
For example, as a sound designer, you could design an automatic ducking system in a few clicks with the REACT feature in AtomCraft (based on the categories the sounds belong too). You could also do it with envelopes or AISACs. The programmer, on his side, could trigger automatic fade-ins / fade-outs with the Fader module at run-time or he could program every single change by updating the volumes of the sound effects themselves or of their respective categories.
The run-time compares favorably with the competition in terms of speed, not in small parts due to CRI’s proprietary codecs (ADX, HCA and HCA-MX), which is especially handy for mobile development. This should not come as a surprise, since CRI Middleware was already assisting Sega Corporation in the early 90s with research into multi-streaming and sound compression technologies, even providing middleware for the Sega Saturn.
Easy integration
ADX2 is part of a middleware package called CRIWARE, which also includes Sofdec2, a video encoding and playback solution with many options, used for example on Destiny. It uses ADX2’s encoder for its audio tracks and share the same underlying file system (if you want to use it).
CRIWARE in general and ADX2 in particular are available on all common platforms from PC and consoles to handhelds and mobile devices.
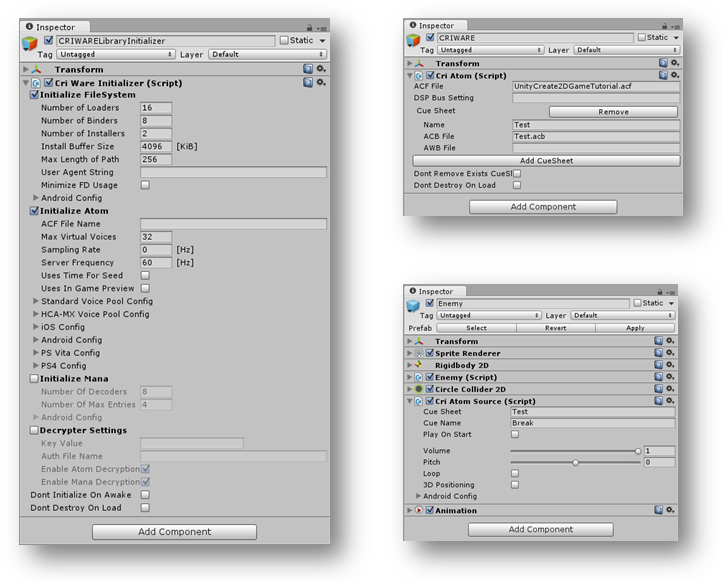
In addition CRIWARE is available as a plug-in for both Unity and Unreal, making it easy to add top-quality audio and video features to your games.
Should you need more information about ADX2, don’t hesitate to contact me; I have been working with it during the past year and have seen first-hand how it can help you implement interactive audio efficiently.
Even better, if you want to see it in action or try the tool by yourself, you can visit CRI Middleware’s booth at GDC 2016 (booth 442, South Hall) or follow their new Twitter account here: @CRI_Middleware for timely updates.
Automatically creating and exporting sounds to Unity
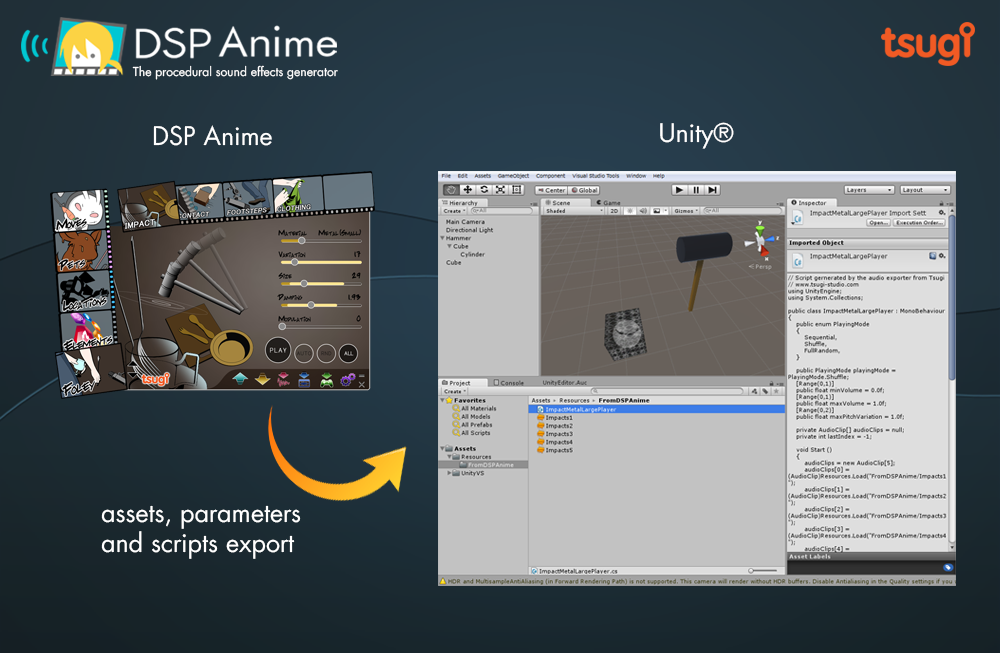
This post is about the Unity export feature in the DSP Anime sound effects generator from Tsugi. It can automatically generate several variations of a sound effect, add them to your Unity project, create the corresponding .meta files and write a script that will allow them to play sequentially or randomly, with or without volume and pitch randomization. All that in one click!
A sound effect generator like no other
DSP Anime is a sound effect creation software especially useful for indie game developers (although a lot of seasoned sound designers also use it to quickly generate raw material they can process later). It’s really as easy as 1-2-3:
1 – You select a category of sounds (for example “Elements”)
2 – You choose the sound model itself (for example “Water”)
3 – You adjust a few pertinent parameters (such as how bubbly the liquid is) to get exactly the sound you want.
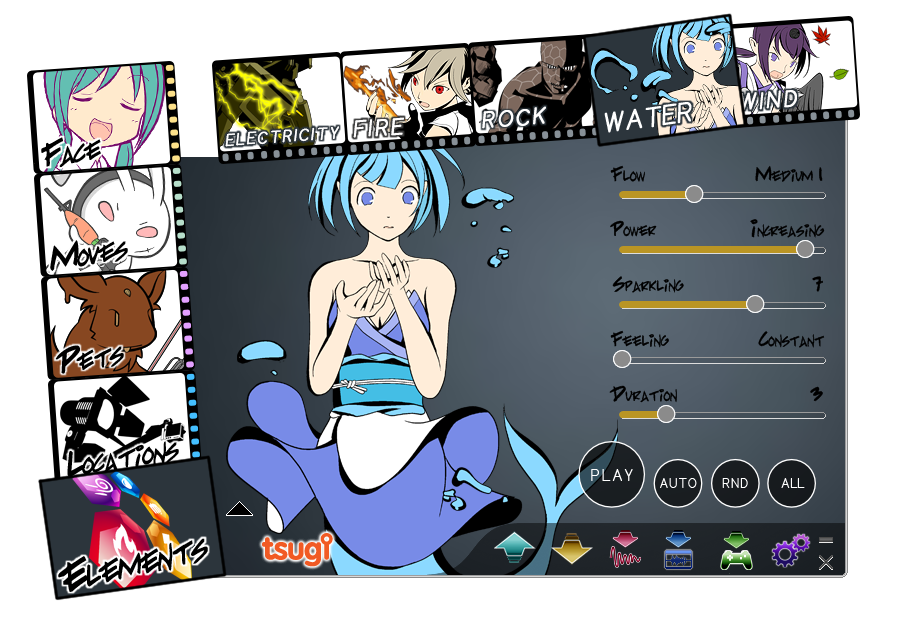
That’s all! You can play and save the result as a wave file.
Because DSP Anime uses procedural audio models instead of samples, you are not stuck with a few pre-recorded sounds but can tweak your effects as you want or generate many variations of a same sound easily to avoid repetitiveness in the game.
Cherry on the cake, new categories are regularly released as free downloadable content. Although initially created for “Anime” sounds, the categories are now very varied. They include for example a model able to create thousands of realistic impact and contact sounds.
A couple of settings
One really interesting feature of DSP Anime is its export to game audio middleware (such as ADX2, FMOD or Wwise). It will automatically create the events, containers, assign the proper settings and copy the generated wave files into the game audio project.
DSP Anime can also export towards game engines such as GameMaker Studio and Unity. We will now give a closer look to the later. First, make sure that the right exporter is selected in the settings window.
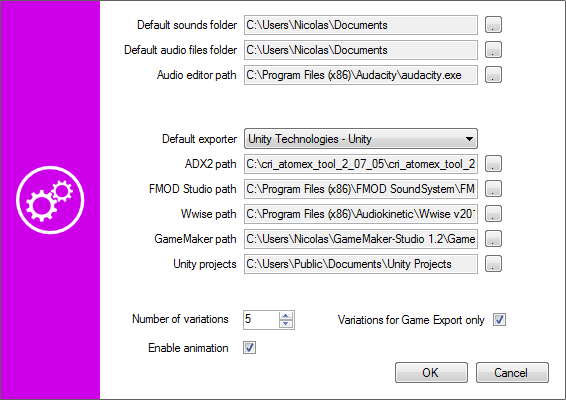
You will also notice that you can enter a number of variations. This is the number of sounds that will be automatically generated based on the parameters you set (and the random ranges you assigned to them) when you export to Unity.
Exporting to Unity
Once you have selected a sound and adjusted its parameters, click on the Export button, the following window will appear:
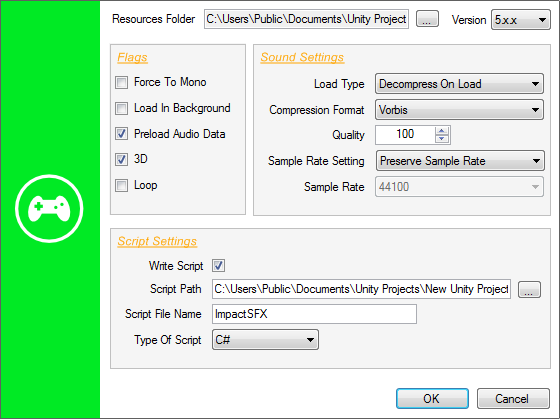
You will have to specify the Resources folder in which you want DSP Anime to export the sound files (which will become Unity audio assets). The corresponding .meta files will also be generated based on your sound settings. This folder must be located under the Assets\Resources folder of your Unity project. If you don’t have a Resources folder in your project yet, you will have to create one.
The Force to Mono, Load In Background and Preload Audio data flags correspond to the audio settings of the same name in Unity. They will be automatically assigned to the audio assets freshly created. The same thing goes for the Load Type, Compression Format, Quality, Sample Rate Setting, and Sample Rate parameters.
If you decide to generate a script in addition to just exporting the audio assets, you can choose the language (Javascript or C#). In that case, the 3D and Loop parameters determine if the sounds will be played as 2D or 3D sources and as one-shots or loops.
Checking your sounds in Unity
When you press the OK button of the Export window, the following happens:
The following picture shows the script parameters as they appear in the inspector in Unity:

The script generated by DSP Anime should be used as a starting point and customized based on the actual requirements of your game. However, it already allows for some interesting sonic behaviors. For example, if you generated several sounds, it will be possible to specify how they will be selected during playback. Three modes are available: sequential, shuffle (i.e. random with no repetitions) and totally random. In addition, the playback volume and pitch can be randomized.
10 reasons to use Alto for Game Audio
This post describes some of the unique features of Alto and explains why anybody working in game audio should use it!
Tsugi just released Alto 2.0. What started as a tool for audio localization quickly became much, much more than that. For less than the price of some metering plug-ins, it will not only analyze and compare all your dialogue files in various localized languages (including loudness, silences, audio format and more) but it will also allow you to correct the files, rename them, test them in situation, generate placeholder dialogue etc…
In other words, it will probably save you a lot of time and money while making sure your deliverables stay at the highest quality standard. So here are 10 reasons you should use Alto if you are in working game audio:
1 – It will adapt to your workflow
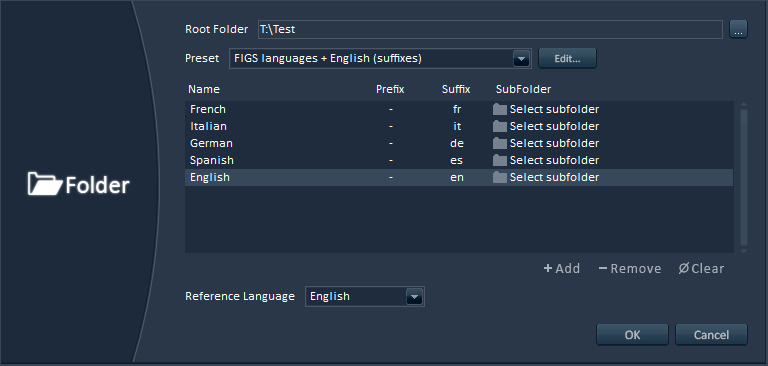
Alto will work with any file naming convention or file hierarchy. As for the languages, it comes with useful presets for FIGS, ZPHR, CJK, PTB etc… but nothing prevents you from adding Klingon to the list if needed!
2 – Advanced analyses
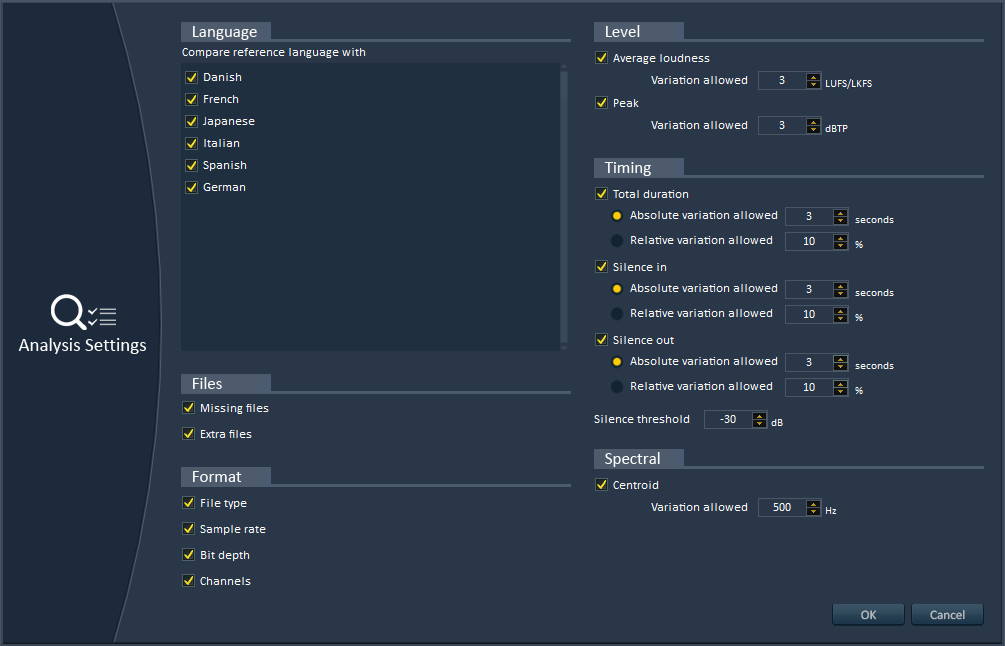
Alto will analyze your localized dialogue files (or any sound files really) and find if anything is missing. It will also make sure that the audio format is correct (sample rate, bit-depth, number of channels). It will even check that the average and peak loudness, the duration, the leading and trailing silences are all within the margins of error you specified.
3 – Automatic correction of errors
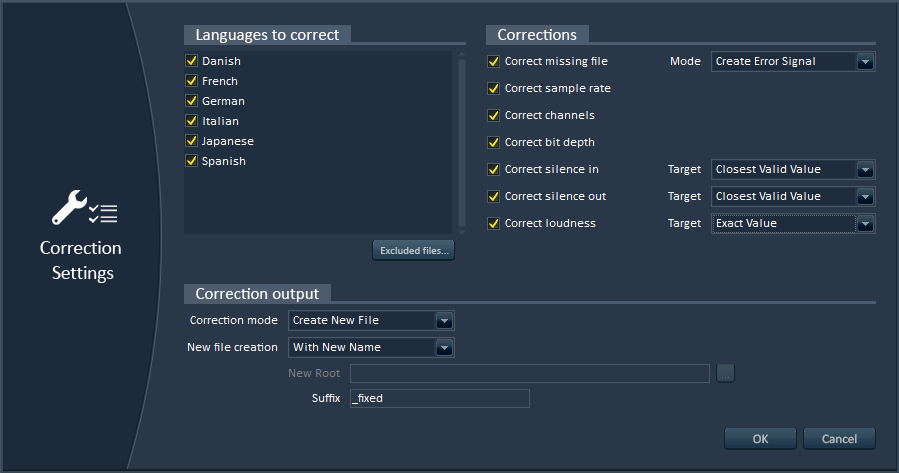
Alto can correct the errors it found automatically, saving you previous time. You can still choose to ignore some files or some types of errors. You can also indicate if you want the correction to hit the exact value of the reference file or the nearest value in the valid range, in order to minimize the audio modifications.
4 – Awesome reports
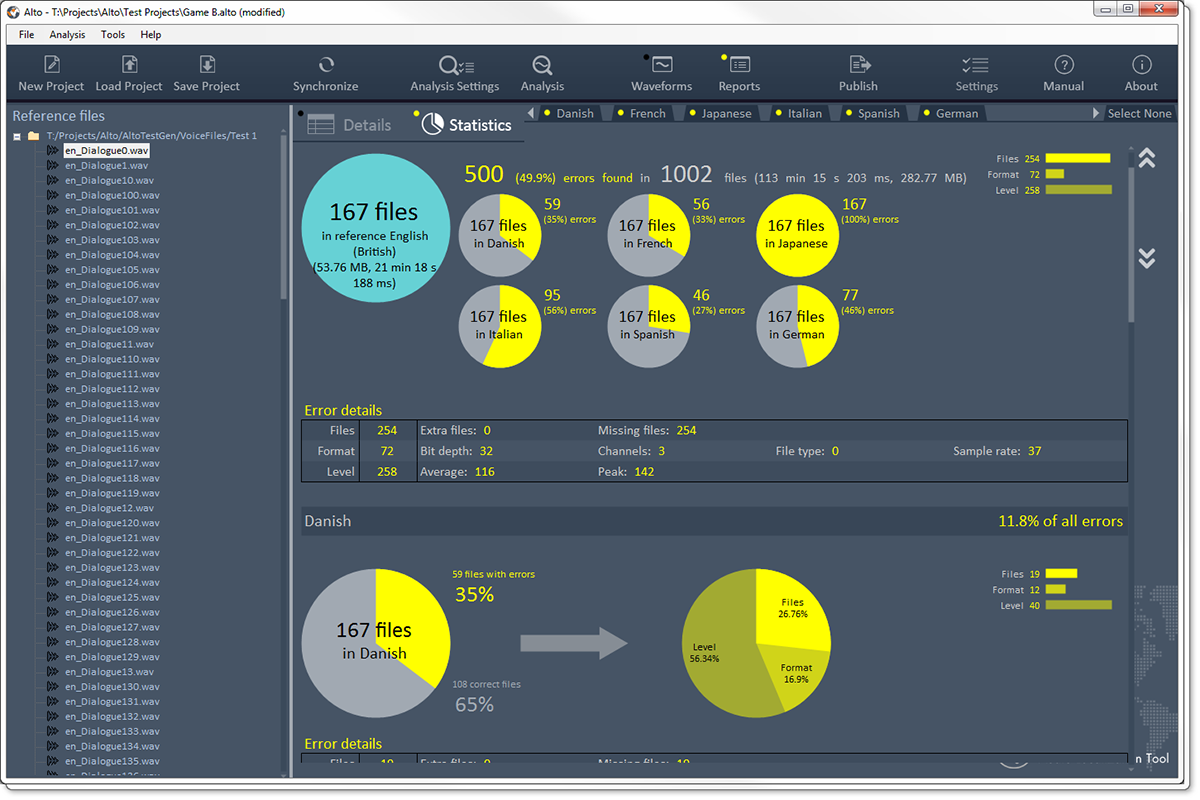
Alto can generate exhaustive and great-looking reports for your team or your client. They can be exported in PDF, HTML or as Excel sheets, so you can adapt to whatever your interlocutor is using. They include all the errors found, statistics with pie charts per language and so on…
5 – Easy integration with your game audio middleware
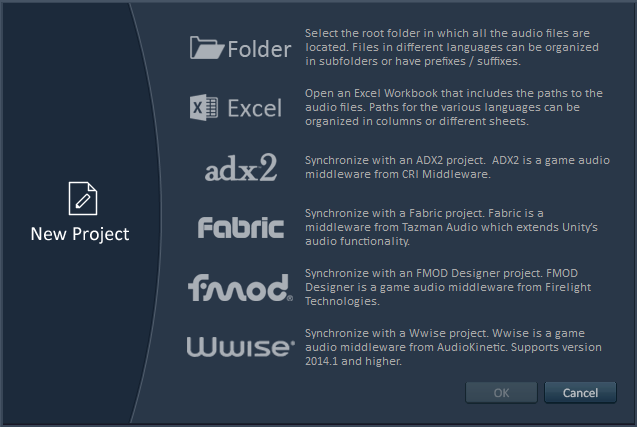
Alto can import dialogue files from your ADX2, Fabric, FMOD or Wwise game audio project and synchronize with it. Know any other software that can do that?
6 – Easy integration with your own technology
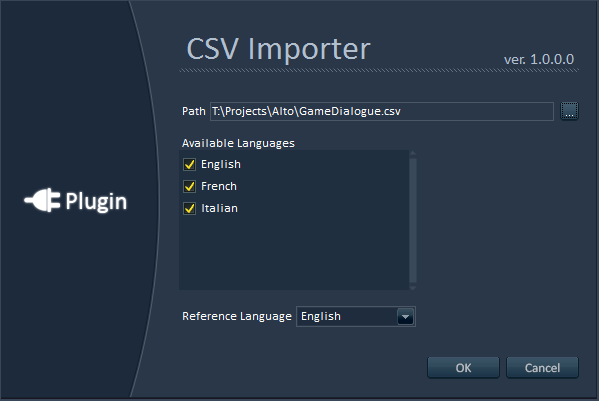
Alto’s plug-in system allows you to interface with your proprietary tools and databases. Its command line version can be called from your build pipeline or from a third-party tool. It can also save reports in XML that can be easily read by other tools.
7 – Versatile Batch Renamer
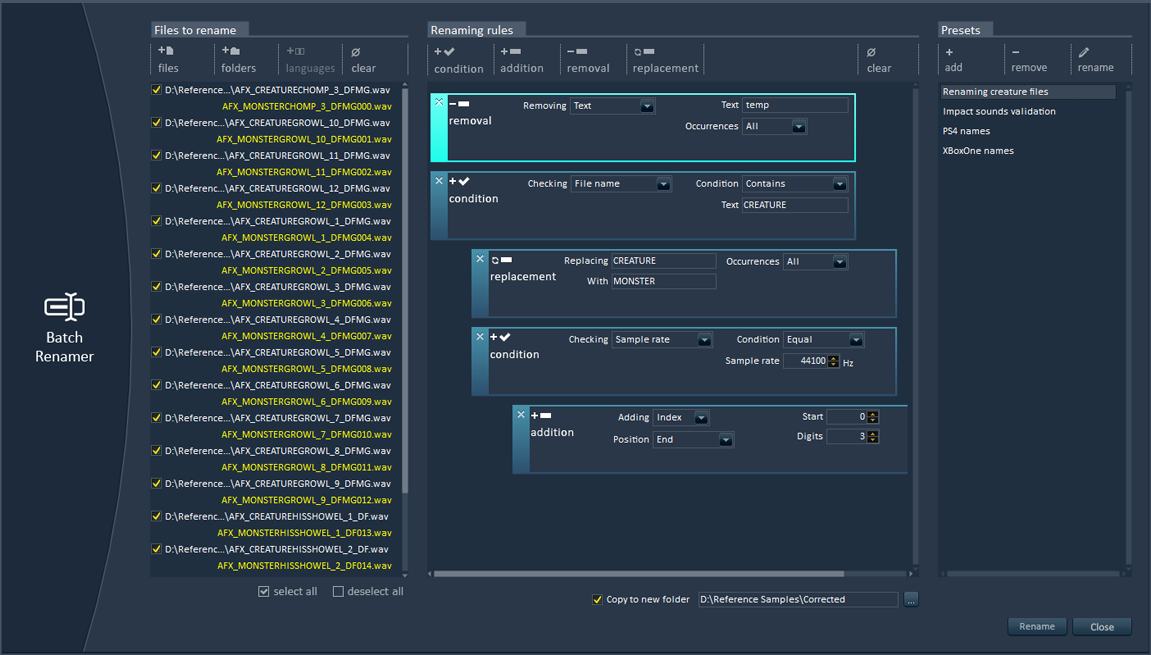
Alto has an absolutely fantastic batch renamer (really, try it…). You don’t need to have an Alto project open: just drop some files, create a renaming preset (based on conditional, additive, removal and replacement rules), press rename and voila! The batch renamer can handle very complex scenarios very easily and can even rename files based on their audio characteristics. Fantastic, I told you ![]()
8 – Loudness Equalization
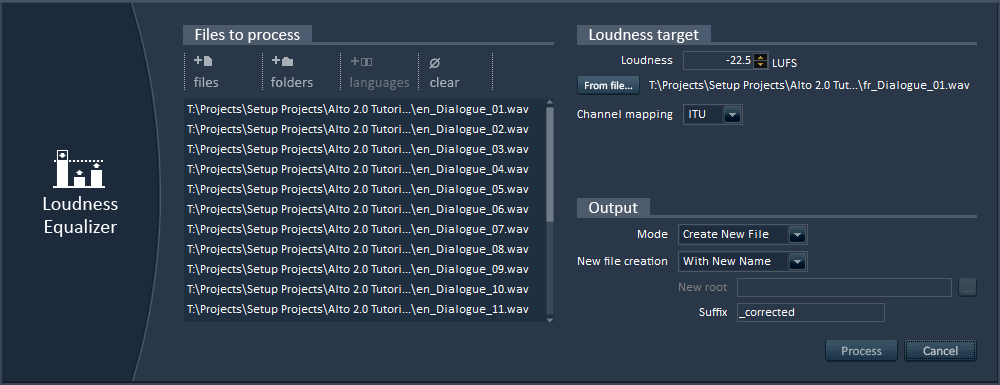
Again, you don’t even have to create an Alto project. Open Alto, open the loudness equalizer tool, drop your audio files (not necessarily dialogue) from the Windows Explorer, enter a target LUFS value or get it by analyzing a sound file, press Process and you are done! It’s that simple!
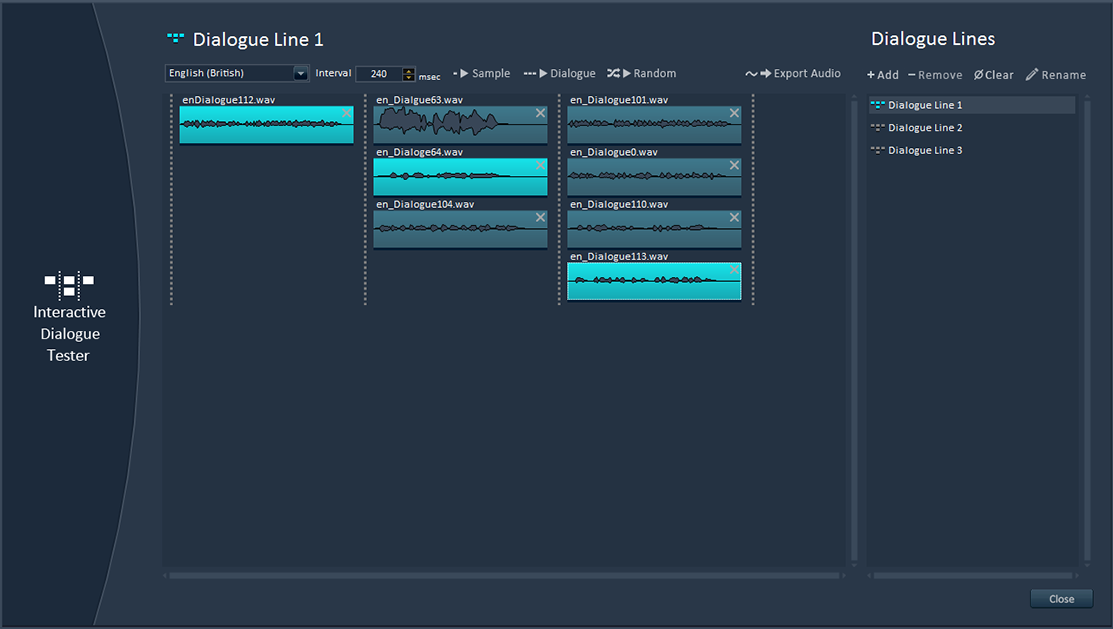
9 – Interactive dialogue tester
No need to fire up your game audio middleware or to ask an audio programmer: Alto comes with its own feature that allows you to test interactive dialogue, including randomization, gaps between sentences etc… You can check how concatenated lines will sound together in a few clicks, with a very user-friendly interface. You can even use it to test the sequencing of sound effects.
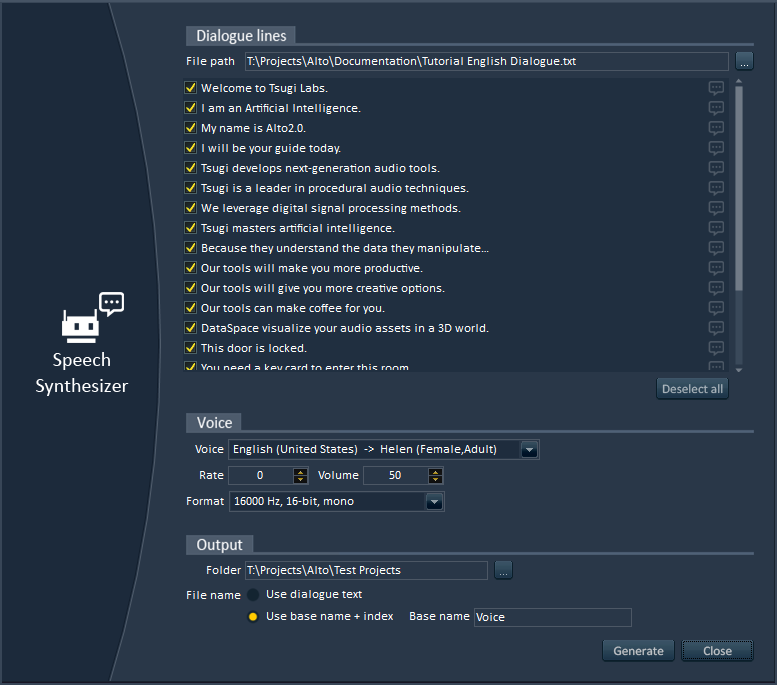
10 – Creation of placeholder dialogue
Thanks to Alto’s speech synthesizer, you can instantly create placeholder dialogue. Here too, no need to create a project. Start Alto, open the Speech Synthesizer tool, import the text or Excel file containing the lines to generate, select a voice in the right language (yep, not only in English!), and here you go, a wave file is generated for each dialogue line!
There are many other cool features in Alto that will make your life as a game audio professional a lot easier. But don’t take my word for it, download the free demo version and give it a try: http://www.tsugi-studio.com/?page_id=1923
Generating thousands of dialogue files
This post describes how we generated thousands of voice files to test Alto, the new audio localization tool released by Tsugi.
So many files, so little time
With the explosion of content in AAA games, it is not rare to end up having thousands or even tens of thousands of dialog lines in a project once they are all translated. Some lines may be recorded internally, others some by external studios or localization agencies. But how do you manage quality control? Comparing all these dialog lines manually would be cumbersome, error-prone, and actually pretty much impossible without an army of little elves with multilingual skills.
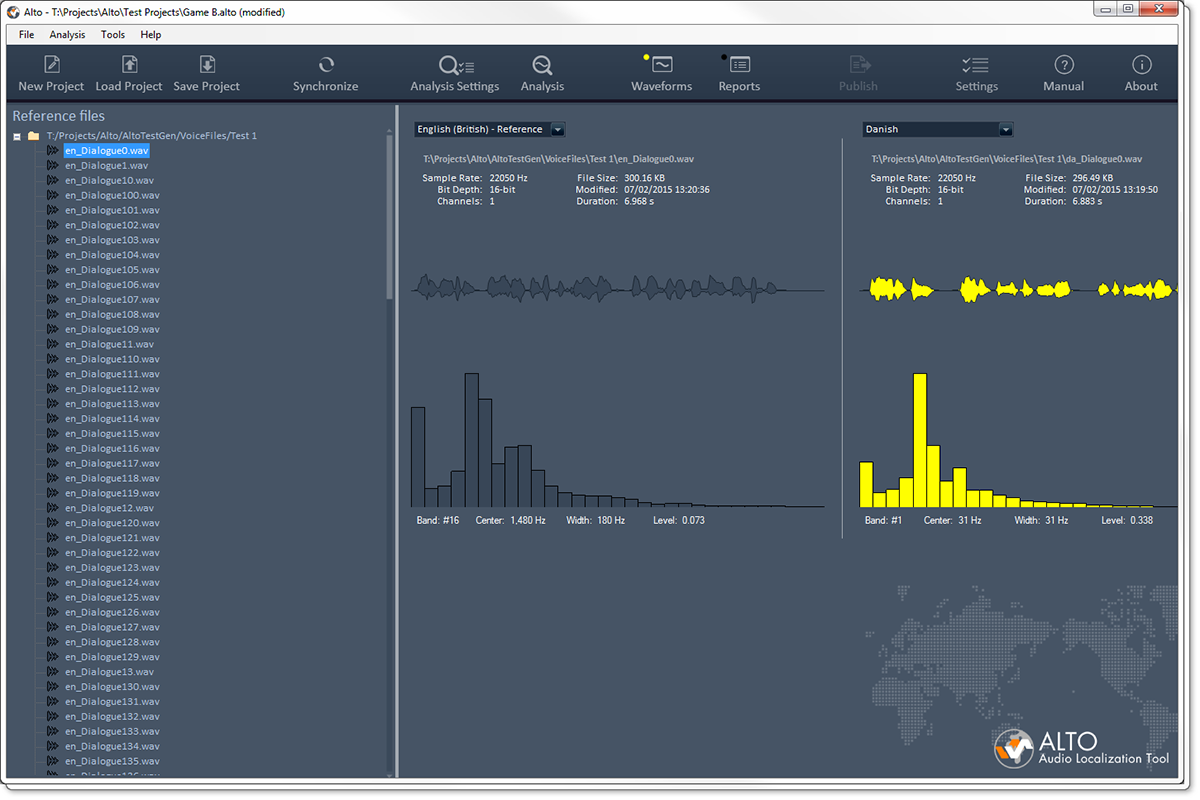
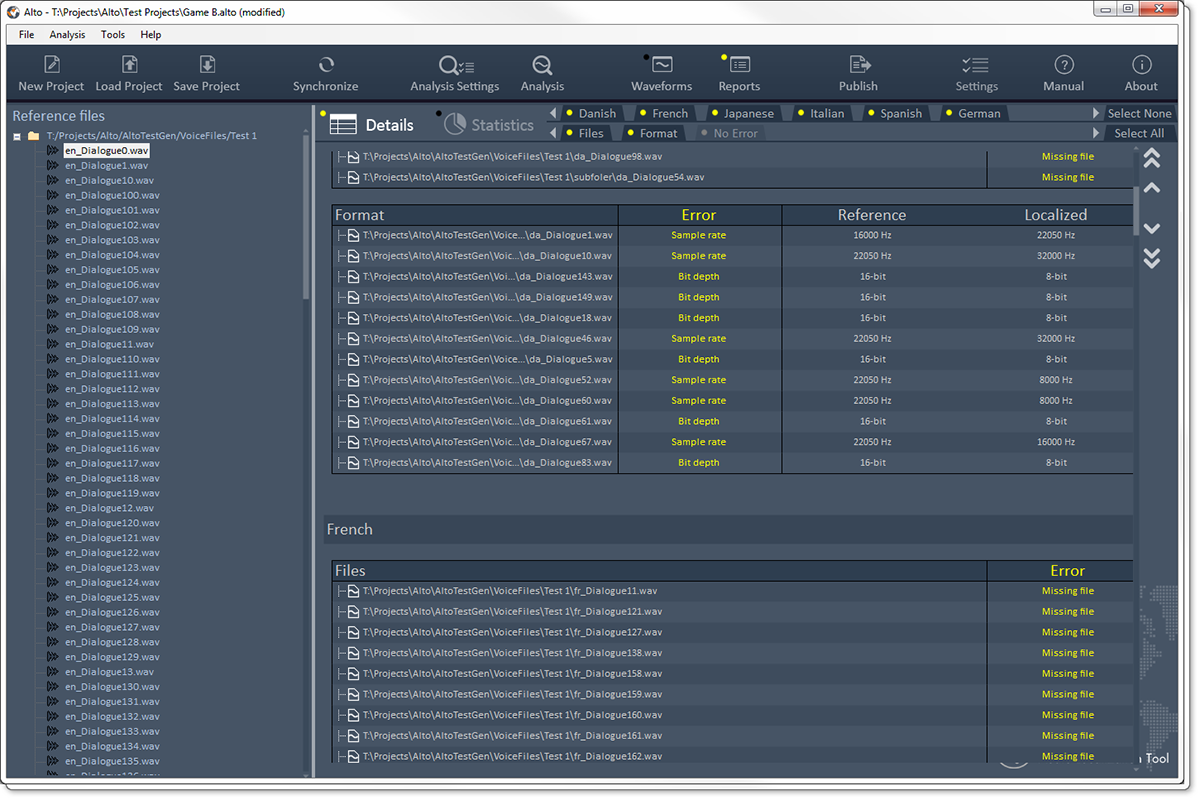
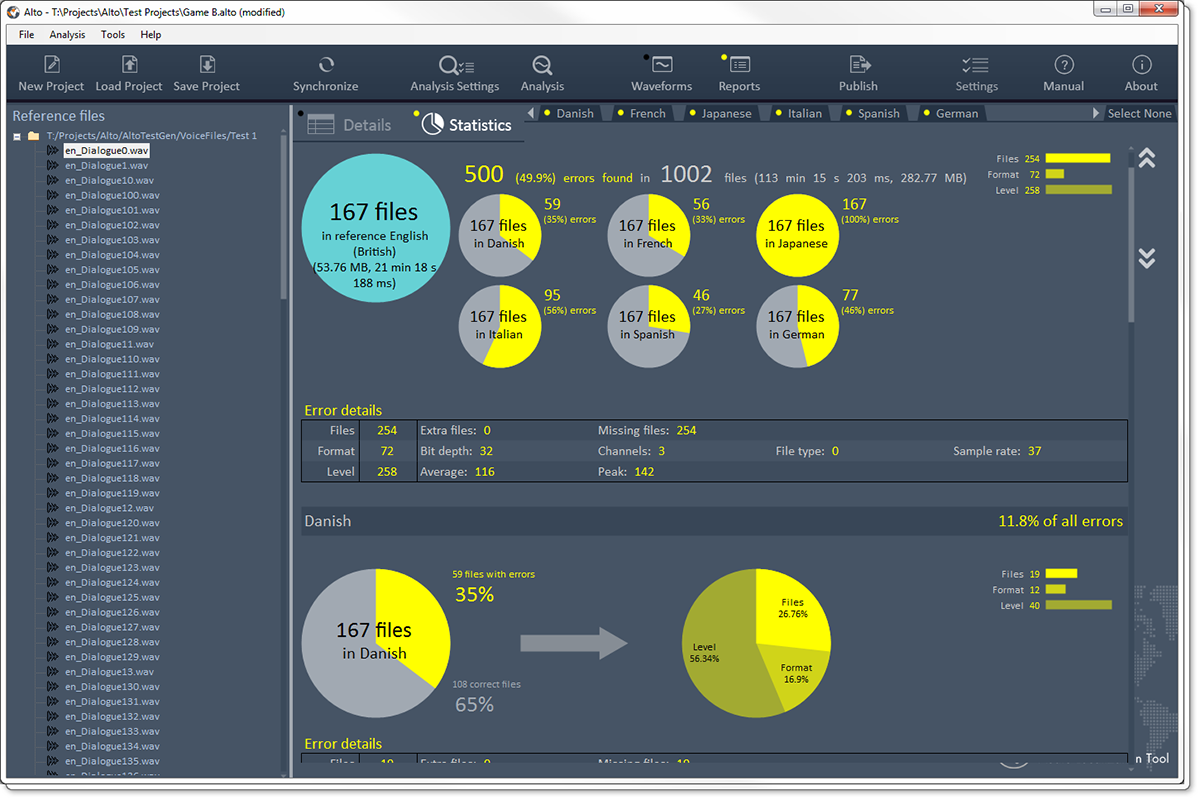
Enter Alto. Alto is an audio localization tool (see how clever?) that compares these thousands of dialogue lines in several languages automatically, finding missing or misnamed files, checking their audio format (sample rate, channels and bit depth), their duration (including leading and trailing silence), their levels (average and peak) or even their timbre. Alto can get the data directly from your folders (with files organized in subfolders, having prefixes or suffixes…) or by reading the files referenced by an Excel sheet or even by importing a game audio middleware project (ADX2, FMOD and Wwise are all supported). Here are a couple of screenshots:
 |
 |
 |
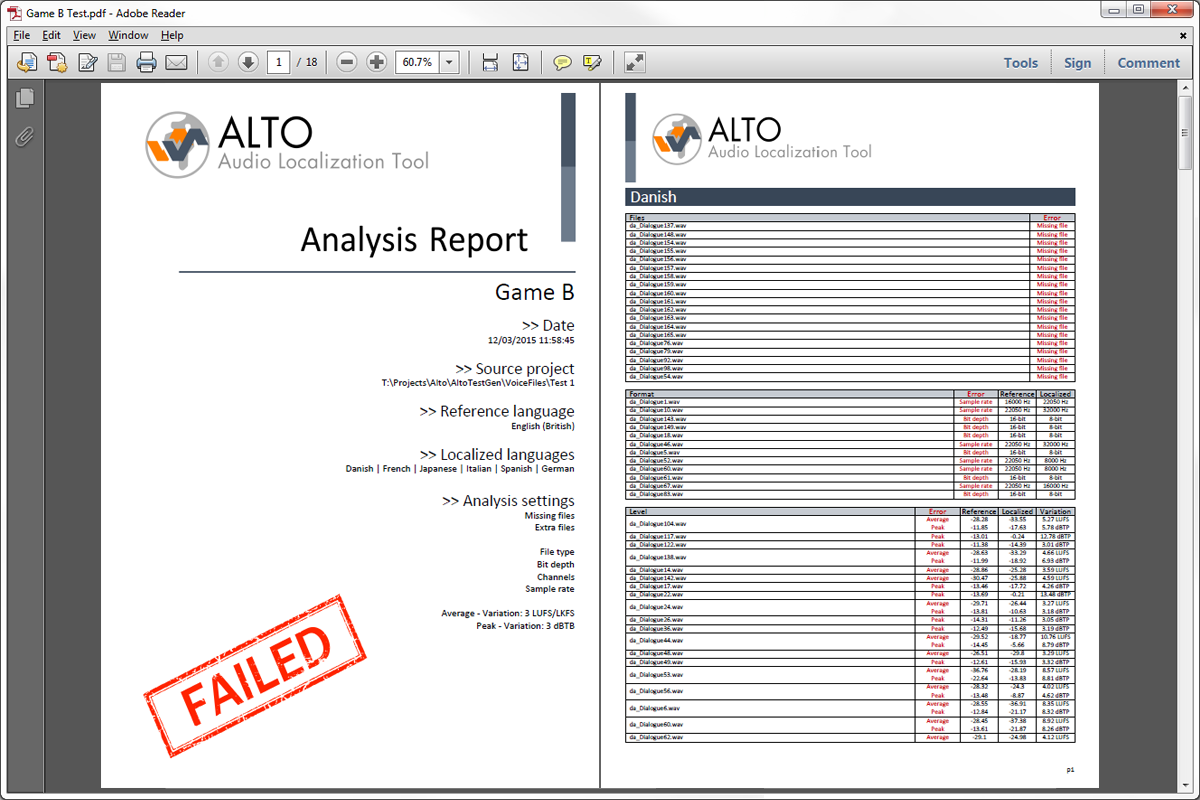 |
Once the analysis done, you can give a nice PDF / Excel / HTML report to your manager or client, showing the quality of you work. Or go back to check all the errors ![]() You can also get an XML file so third party tools could read it and automatically mark dialogue as final or placeholder for example.
You can also get an XML file so third party tools could read it and automatically mark dialogue as final or placeholder for example.
It’s incredible the number of small – and sometimes bigger- errors the studios who beta-tested Alto have found in their older projects. That does not mean their work was bad, but simply that it is nearly impossible to get perfect localized dialogue in each language on big projects without some kind of automated process to test everything.
Computer polyglotism
Testing Alto meant that we needed thousands of audio files in many languages. This kind of data is quite hard to get. Asking files from old projects to some of our clients would have taken time due to IP concerns. Of course, we planned to have beta-testing with game studios, but we at least needed something to help us develop the program, before it even reached the beta-testing stage.
It’s not that uncommon in the game industry to generate placeholder dialogue lines with a speech synthesizer. So I decided to do the same with the test files and to write an application which would create all these files for us.
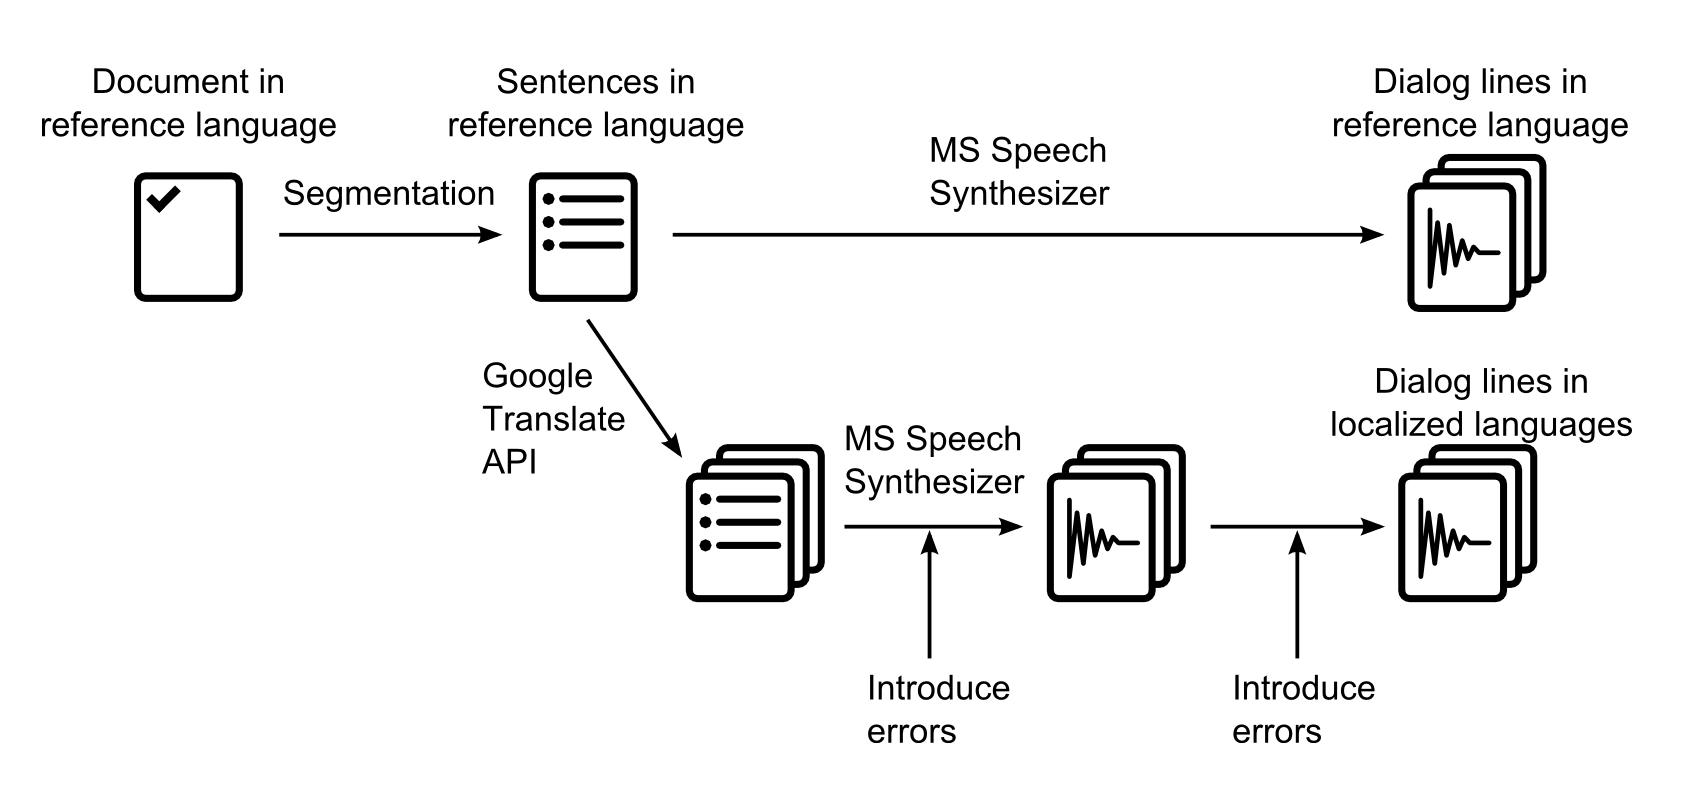
This application takes a text file as input. It starts by segmenting it into sentences based on the punctuation marks. Then I use the Microsoft Speech Synthesizer to generate the audio files for the reference language. The next step is to send the sentences to the Google Translate API to be translated in order to synthesize them in other languages. It turns out that the Google Translate API is not free anymore (alternatives are not free either or of lesser quality). Even for a few files, you need to register and enter your credit card information, you need an API key etc… However, Google’s interactive translation web page still makes callbacks using public access without an API key. By giving a look to these AJAX calls and sending them directly from code it is possible to get your translation done (you just need to parse out the JSON returned).
Since we are sending the text sentence by sentence and not as a big chunk of text, we don’t have a problem with the size limit imposed by Google’s translation web page. Of course this also means that we make many more calls, which could be a problem speed-wise. Fortunately, it ends up being very fast. Having now translated the text in various languages, I sent it to the corresponding voices I downloaded for the Microsoft Speech Synthesizer. You can find 27 of them here! (On that topic, make sure that the voices you are downloading are for the version of the synthesizer you have installed).
Purposedly wrong
Finally, I needed to introduce some errors to make sure Alto was doing its job correctly. The Microsoft Speech API allows us to choose different types of voices as well as different rates and volumes of speech, which was an easy starting point to add some variations. In addition, the program re-opens some of the files generated and saves them in a different format, with a different number of channels, sample rate or bit-depth. Some files are also renamed or deleted to simulate missing and misnamed files. I used some existing Tsugi libraries to add some simple audio processing to stretch the sounds, add silence at the beginning or at the end, as well as to insert random peaks. To test the spectral centroid, the application also boasts a few filters.
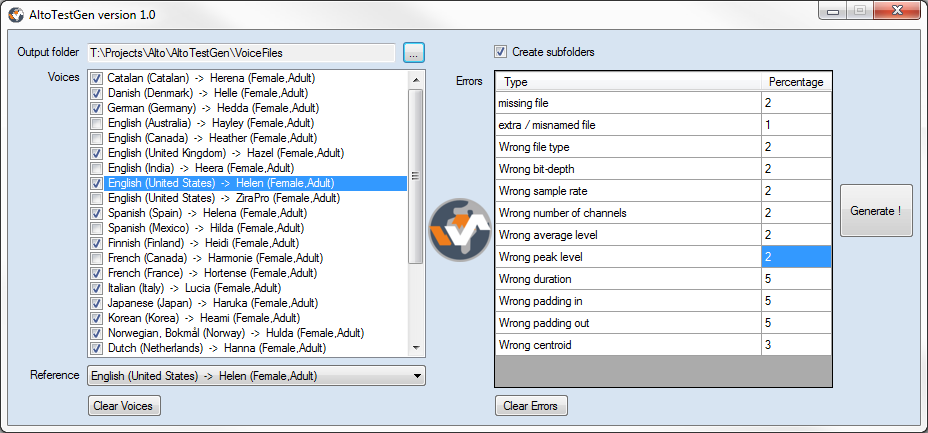
The user interface of our little tool allows us to select the voices (and therefore the corresponding languages) we want to generate dialogue for, as well as a percentage for each type of error we want to insert. Playing with the percentages allows us to test various cases from one or two tiny mistakes lost in thousands of files to all files having multiple errors. The program also generates a log file so we can see which errors were added to which files and check that they are actually detected in Alto.
Here is a picture of AltoTestGen:
Not very pretty but it did the job! All in all, after just a couple of hours of programming, we had thousands of lines in about 20 languages and could generate thousands of new ones in a matter of minutes. Although the voice acting is definitely not AAA ![]() , these files are easy to recognize and perfect for our tests: mission accomplished!
, these files are easy to recognize and perfect for our tests: mission accomplished!
Audio Dashboards
This post is about Audio Dashboards, a technique we devised at Tsugi to improve the game audio workflow of our clients.
Where it came from
At Tsugi, we provide consulting services to game studios. We visit their audio departments, sit down with the sound designers and try to get a better understanding of their workflow, both in general and in the context of their current project: what are their most common tasks, how do they tackle them, what are the bottlenecks and what technologies are they missing. We then write a report and make recommendations. The team can implement these changes with our help, ask us to do it for them or just leave it at that for the time being. Often, we end up developing new types of tools in the process, which is exactly what happened with the Audio Dashboards.
The idea for the Audio Dashboards came from a couple of observations during these visits:
– Often, the GUI of the audio middleware / internal tool is not the most adequate for the project or for the team. A middleware company must cater to the wishes of the many and their solution cannot be the most efficient or intuitive for a given project. As for audio internal tools, they are often considered fine as long as they can export the data correctly.
– In mid-sized audio teams and bigger audio departments, it is not rare to have sound designers working on a specific type of content for a game: Foley, weapons, ambiences etc… Therefore, they always use the same subset of features of the middleware and the other ones are in the way.
– Sometimes the information the sound designers need is simply not available in the tool, or they would like to see it presented in a different way. Maybe they would like to see a pie chart representing the memory consumption per sound bank. Or maybe they would like a more immediate and graphic way to setup random containers and assign a weight to the different assets.
What it is
What we call Audio Dashboards at Tsugi are actually simple software layers that give you the information you want (and only that) while offering a better interface (more intuitive, more productive) to do your work. They are custom-made standalone applications that you run on the top (or instead) of the middleware or internal audio tool and that export data towards them.
An Audio Dashboard can serve as a façade to one or several tools simultaneously and they don’t have to be limited to audio. For example, a sound designer working on ambiences could have a dashboard which includes parameters linked to the level editor of his or her game. Similarly, the dashboard for a sound designer working on first-person Foley could get some input from an animation tool. Of course, this assumes that we can communicate in some way with the other software or at the very least read its project files.
Useful features can be added to the Audio Dashboard itself, like VST hosting, allowing you to process your assets with a VST plug-in chain specific to your project (and saving you the multiple switches between your audio middleware and your DAW). We can also implement your favorite input controls: map key shortcuts / mouse buttons as you want, add support for a MIDI control surface or any other input peripheral such as the Leap. Finally, statistics on banks can be generated and various reports exported, which makes Audio Dashboards very useful tools for any audio director wanting to keep track of a project without having to dive in all the implementation details.
An example
Here is an example of a very simple interface that we imagined for a client to create dynamic sound effects or dialogue.
You can drag and drop samples directly on the work pane (they will be automatically added to the banks and all the intermediary objects such as containers for Wwise or Cues for ADX2 will be created later as well). The samples are represented by colored circles. They are organized horizontally (sequencing) and vertically (selection). The colors indicate their behavior (green = single sample that is always played, blue = randomized samples, pinkish = samples selected from a game input). The size of a circle corresponds to the volume of the sample, and its opacity to the probability that it will be selected. On this picture, random ranges for volume and pan are also visible.
There is no information about the underlying data structure (containers, switches, how they are connected etc…) because it should not be the first thing a sound designer has to think about. Very complex behaviors can be defined easily with this interface, while the overview is always visible and understandable. Because the sound designer only has to focus on the creative part and does not have to deal with all the implementation details, it makes him/her more productive while also minimizing the risks of errors.
How it works
In all the Audio Dashboards, we first select a game audio project (e.g. .wproj for Wwise, .fspro for FMOD Studio or atmcproject for ADX2). From there, we can read the information about the structure of the project, the individual work units etc… This will allow us to get access to any existing data we would like to reference and also to make sure that there are no conflicts (names, IDs…) between the data we are generating and the data currently in the project.
Once the sound designer is done editing the data, we build the intermediary audio objects that correspond to what he did and then export them to the middleware. New banks are created if needed, samples are copied, random containers are built, volume, pitch, pan and filter settings are assigned to sound events etc…
This is made easier by the fact that now all the main game audio middleware use separate files (XML or XML-like such as Orca) to store their sound objects, and not a giant monolithic project file (as it was for example the case with the previous generation of tools like FMOD Designer or the former version of ADX2).
This brings us to another interesting benefit of having a façade. It can serve as a common interface from which to export to various run-times. Having a similar editing experience whatever your engine is can definitely save a lot of time, especially if you switch middleware mid-project or between two installments of the same franchise (and have a lot of assets to port). A lot of the features are similar between the middleware tools (packaging of samples in banks, randomization, volume, pan, pitch, filter parameters etc…) so it is relatively easy to export to all of them from a single interface. Moreover, at Tsugi we already developed a special library that interfaces with the three main game audio middleware. All our software from professional to hobbyist level is able to import or export data for ADX2, Fmod and Wwise.
Before concluding, a point worth mentioning is playback within the dashboard. Several methods can be used. Some middleware or internal audio tools provide you with an API to control them, in some other cases we are able to call the bank creation command line utility and use a minimal run-time to play the sound. In some cases it’s not such a big deal and you simply create your assets on the dashboard and just switch to the tool to play. In cases such as the example described above – or if you just want to test how a random container will sound and adjust the different weights – the playback can be coded as part of the dashboard itself.
If you have questions about the concept of Audio Dashboards or you think your audio department could benefit from our help designing one (or if you want us to look at other ways to improve your game audio workflow), feel free to contact me directly or Tsugi through the contact form.

